本文共 11918 字,大约阅读时间需要 39 分钟。
install devstack(liberty) in ubuntu14.04
First you should download ubuntu14.04 , in my limited situation , I use ubuntu 14.04 server .
- I tried to use virtulbox which I used a lot , but something went wrong which I want to share it .
运行环境的选择
对于刚刚接触OpenStack的开发者而言,没有太多闲置的资源,所以比较容易的上手方式就是使用虚拟机。对于桌面的虚拟机软件来说,主流的软件无外乎VMWare Workstation和Oracle Virtualbox,对于OpenStack开发而言,二者并无太大差异。以下几点可能会作为选择的主要依据: (1)VMWare Workstation是收费软件,Virtualbox是免费软件 (2)VMWare Workstation支持nested virtualization,就是安装完的devstack virt type是kvm,节省资源,Virtualbox安装以后只能使用qemu,虽然在Virtualbox 5以上版本号称支持,但是实际验证中仍然不能生效,还在研究中 (3)VMWare Workstation使用NAT方式时,内部的IP可以在HOST主机直接访问到,Virtualbox还需要端口转发,所以建议单独增加一块Host-only的Apdaptor便于调试 (4)使用Virtualbox时,为了让虚拟机能够访问外部网络,并且允许Host通过Floating IP对虚拟机进行访问,需要在Host层面设置NAT规则,转换到可以访问的物理网卡上so I tried to intsall with linux bridge mode and my host can ssh to the vm.when you intsall the ubuntu 14.04 server you should select openssh and DNSserver .
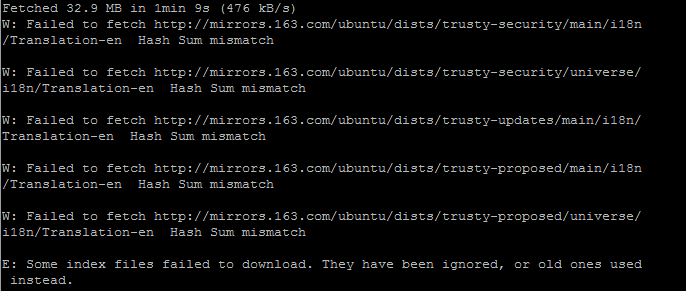
and because of we are in China so you should change the apt-get source , when I use 163 source ,it comes out the info “Failed to fetch “
编辑源文件/etc/apt/sources.list,并添加以下地址
sudo gedit /etc/apt/sources.list网易163源:
deb http://mirrors.163.com/ubuntu/ trusty main restricted universe multiversedeb http://mirrors.163.com/ubuntu/ trusty-security main restricted universe multiversedeb http://mirrors.163.com/ubuntu/ trusty-updates main restricted universe multiversedeb http://mirrors.163.com/ubuntu/ trusty-proposed main restricted universe multiversedeb http://mirrors.163.com/ubuntu/ trusty-backports main restricted universe multiversedeb-src http://mirrors.163.com/ubuntu/ trusty main restricted universe multiversedeb-src http://mirrors.163.com/ubuntu/ trusty-security main restricted universe multiversedeb-src http://mirrors.163.com/ubuntu/ trusty-updates main restricted universe multiversedeb-src http://mirrors.163.com/ubuntu/ trusty-proposed main restricted universe multiversedeb-src http://mirrors.163.com/ubuntu/ trusty-backports main restricted universe multiverse
搜狐源:
deb http://mirrors.sohu.com/ubuntu/ trusty main restricted universe multiversedeb http://mirrors.sohu.com/ubuntu/ trusty-security main restricted universe multiversedeb http://mirrors.sohu.com/ubuntu/ trusty-updates main restricted universe multiversedeb http://mirrors.sohu.com/ubuntu/ trusty-proposed main restricted universe multiversedeb http://mirrors.sohu.com/ubuntu/ trusty-backports main restricted universe multiversedeb-src http://mirrors.sohu.com/ubuntu/ trusty main restricted universe multiversedeb-src http://mirrors.sohu.com/ubuntu/ trusty-security main restricted universe multiversedeb-src http://mirrors.sohu.com/ubuntu/ trusty-updates main restricted universe multiversedeb-src http://mirrors.sohu.com/ubuntu/ trusty-proposed main restricted universe multiversedeb-src http://mirrors.sohu.com/ubuntu/ trusty-backports main restricted universe multiverse
3、 更新源索引,使新源生效
sudo apt-get updateinstall
安装
apt-get install git 下载devstack cd /home git clone 目前Devstack脚本已经不支持直接使用root身份运行,你需要创建stack用户运行 cd /home/devstack/tools/ ./create-stack-user.sh 修改devstack目录权限,让stack用户可以运行 chown -R stack:stack /home/devstack chmod 777 /dev/pts/0 可以考虑在虚拟机里增加一块磁盘专门给cinder使用,这个需要在运行脚本前创建好。(可选) pvcreate /dev/sdb vgcreate stack-volumes-lvmdriver-1 /dev/sdb 切换的stack用户下 su stack cd /home/devstack 进入devstack目录下,创建local.conf文件[[local|localrc]]# Define images to be automatically downloaded during the DevStack built process.IMAGE_URLS="http://download.cirros-cloud.net/0.3.4/cirros-0.3.4-x86_64-disk.img"# CredentialsDATABASE_PASSWORD=passADMIN_PASSWORD=passSERVICE_PASSWORD=passSERVICE_TOKEN=passRABBIT_PASSWORD=pass#FLAT_INTERFACE=eth0HOST_IP=192.168.27.128SERVICE_HOST=192.168.27.128MYSQL_HOST=192.168.27.128RABBIT_HOST=192.168.27.128GLANCE_HOSTPORT=192.168.27.128:9292## Neutron optionsQ_USE_SECGROUP=TrueFLOATING_RANGE="192.168.27.0/24"FIXED_RANGE="10.0.0.0/24"Q_FLOATING_ALLOCATION_POOL=start=192.168.27.102,end=192.168.27.110PUBLIC_NETWORK_GATEWAY="192.168.27.2"Q_L3_ENABLED=TruePUBLIC_INTERFACE=eth0Q_USE_PROVIDERNET_FOR_PUBLIC=TrueOVS_PHYSICAL_BRIDGE=br-exPUBLIC_BRIDGE=br-exOVS_BRIDGE_MAPPINGS=public:br-ex# Work offline#OFFLINE=True# Reclone each timeRECLONE=yes# Logging# -------# By default ``stack.sh`` output only goes to the terminal where it runs. It can# be configured to additionally log to a file by setting ``LOGFILE`` to the full# path of the destination log file. A timestamp will be appended to the given name.LOGFILE=/opt/stack/logs/stack.sh.logVERBOSE=TrueLOG_COLOR=TrueSCREEN_LOGDIR=/opt/stack/logs# the number of days by setting ``LOGDAYS``.LOGDAYS=1# Database Backend MySQLenable_service mysql# RPC Backend RabbitMQenable_service rabbit# Enable Keystone - OpenStack Identity Serviceenable_service key# Horizon - OpenStack Dashboard Serviceenable_service horizon# Enable Swift - Object Storage Service without replication.enable_service s-proxy s-object s-container s-accountSWIFT_HASH=66a3d6b56c1f479c8b4e70ab5c2000f5SWIFT_REPLICAS=1# Enable Glance - OpenStack Image serviceenable_service g-api g-reg# Enable Cinder - Block Storage service for OpenStack#VOLUME_GROUP="cinder-volumes"enable_service cinder c-api c-vol c-sch c-bak# Enable Heat (orchestration) Serviceenable_service heat h-api h-api-cfn h-api-cw h-eng# Enable Trove (database) Serviceenable_service trove tr-api tr-tmgr tr-cond# Enable Sahara (data_processing) Serviceenable_service sahara# Enable Tempest - The OpenStack Integration Test Suiteenable_service tempest# Enabling Neutron (network) Servicedisable_service n-netenable_service q-svcenable_service q-agtenable_service q-dhcpenable_service q-l3enable_service q-metaenable_service q-meteringenable_service neutron## Neutron - Load Balancingenable_service q-lbaas## Neutron - Firewall as a Serviceenable_service q-fwaas## Neutron - VPN as a Serviceenable_service q-vpn# VLAN configuration.Q_PLUGIN=ml2ENABLE_TENANT_VLANS=True# GRE tunnel configuration#Q_PLUGIN=ml2#ENABLE_TENANT_TUNNELS=True# VXLAN tunnel configuration#Q_PLUGIN=ml2#Q_ML2_TENANT_NETWORK_TYPE=vxlan# Enable Ceilometer - Metering Service (metering + alarming)enable_service ceilometer-acompute ceilometer-acentral ceilometer-collector ceilometer-apienable_service ceilometer-alarm-notify ceilometer-alarm-evalenable_service ceilometer-anotification## Enable NoVNCenable_service n-novnc# BranchesKEYSTONE_BRANCH=stable/libertyNOVA_BRANCH=stable/libertyNEUTRON_BRANCH=stable/libertySWIFT_BRANCH=stable/libertyGLANCE_BRANCH=stable/libertyCINDER_BRANCH=stable/libertyHEAT_BRANCH=stable/libertyTROVE_BRANCH=stable/libertyHORIZON_BRANCH=stable/libertySAHARA_BRANCH=stable/libertyCEILOMETER_BRANCH=stable/libertyTROVE_BRANCH=stable/liberty# Select Keystone's token format# Choose from 'UUID', 'PKI', or 'PKIZ'# INSERT THIS LINE...KEYSTONE_TOKEN_FORMAT=${KEYSTONE_TOKEN_FORMAT:-UUID}KEYSTONE_TOKEN_FORMAT=$(echo ${KEYSTONE_TOKEN_FORMAT} | tr '[:upper:]' '[:lower:]')[[post-config|$NOVA_CONF]][DEFAULT]# Ceilometer notification driverinstance_usage_audit=Trueinstance_usage_audit_period=hournotify_on_state_change=vm_and_task_statenotification_driver=nova.openstack.common.notifier.rpc_notifiernotification_driver=ceilometer.compute.nova_notifier unfortunately, after one-hour waitting , I can only see the horizon, I tired to ./unstack.sh and ./stack.sh , but it didn’t work out.
so I want to find out the reason that makes me failed ,
提高Devstack安装成功率
估计在国内使用Devstack的人基本都遇到过安装失败的状况,为了节约大家的时间,先分析一下Devstack为什么会失败,我们先从这张时序图看一下Devstack执行的过程: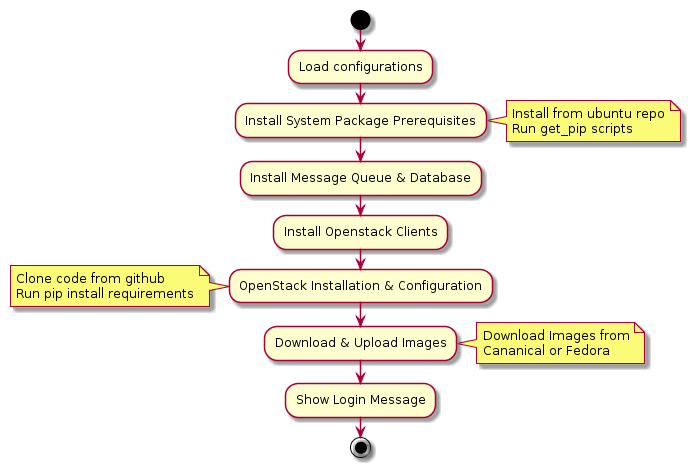 从上述流程图中可以很清楚的看到Devstack有以下几个地方需要访问网络: 安装依赖时,需要访问Ubuntu的源 执行get_pip.sh时,地址是彻底被墙的,需要访问 从github clone源代码,github在国内访问速度并不很快而且间歇性被墙 安装过程中执行pip install requirements,需要访问pip repo 下载镜像,这一步骤取决于你需要安装的模块,如果默认安装只会下载cirros镜像,但是如果是安装类似Trove的模块,可能需要下载的更多
 所以综上所述,为了提高devstack的安装成功率,需要从这几个方面着手优化:
使用国内源从国内源获取get-pip.py,从源代码可以分析出,检测get-pip.py的方式,这里面有两种方式一种是手动下载get-pip.py之后,注释代码,还有一种就是修改PIP_GET_PIP_URL的地址,但是这里只能通过修改install_pip.sh的方式,暂时无法从环境变量里获取
devstack/tools/install_pip.shFILES=$TOP_DIR/filesPIP_GET_PIP_URL=https://bootstrap.pypa.io/get-pip.pyLOCAL_PIP="$FILES/$(basename $PIP_GET_PIP_URL)"function install_get_pip { # The OpenStack gate and others put a cached version of get-pip.py # for this to find, explicitly to avoid download issues. # # However, if DevStack *did* download the file, we want to check # for updates; people can leave their stacks around for a long # time and in the mean-time pip might get upgraded. # # Thus we use curl's "-z" feature to always check the modified # since and only download if a new version is out -- but only if # it seems we downloaded the file originally. if [[ ! -r $LOCAL_PIP || -r $LOCAL_PIP.downloaded ]]; then curl --retry 6 --retry-delay 5 \ -z $LOCAL_PIP -o $LOCAL_PIP $PIP_GET_PIP_URL || \ die $LINENO "Download of get-pip.py failed" touch $LOCAL_PIP.downloaded fi sudo -H -E python $LOCAL_PIP} 修改为在coding.net上缓存的get-pip脚本
devstack/tools/install_pip.shPIP_GET_PIP_URL=https://coding.net/u/xiaoquqi/p/pip/git/raw/master/contrib/get-pip.py
国内的代码托管服务器有从github上定期同步源代码的,但是经过实际测试都不是很理想,所以可能这是最不稳定的一部分,但是可以提前使用脚本,人工的下载所有代码,
现在pip的安装速度明显提升,原来还需要使用国内源,例如豆瓣,现在即使不修改也能很快的进行安装 镜像下载建议使用一些下载工具,然后放到指定的目录中,这样最有效OFFLINE模式下安装Devstack
在Devstack中提供了一种OFFLINE的方式,这种方式的含义就是,当你第一次完成安装后,所有需要的内容已经下载到本地,再次运行就没有必要访问网络了(前提是你不想升级),所以可以将安装模式设置为OFFLINE,避免网络的访问,方法为: devstack/localrc OFFLINE=Trueimportant
1: 单节点Nova-Network的安装
这应该就是Devstack默认的模式,有以下几点需要注意: 根据上面的网卡配置 第一块网卡为NAT方式,用于访问外部网络 第二块为Host-only Adaptor,用于虚拟机桥接网路 需要注意的是:这种方式下并不能让虚拟机正常访问外部网络,可以通过将eth1设置为Bridge模式,但是这样会造成DHCP冲突(如果外部网络有DHCP),所以暂时没有完美的解决方案solution change
so I use VMware workstation
the network conf is below:
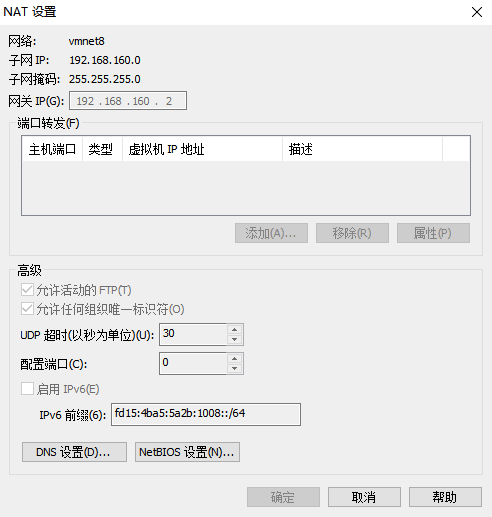
and I use aliyun source to apt-get update
hope this time will sucess后来又出错:报错如下:
/home/devstack/lib/neutron-legacy: line 884: /opt/stack/neutron/tools/generate_config_file_samples.sh: No such file or directory完整log如下
2015-12-30 22:24:55.606 | 2015-12-31 06:24:55.606 ^[[00;36mINFO glance.db.sqlalchemy.metadata [^[[00;36m-^[[00;36m] ^[[01;35m^[[00;36mFile /etc/glance/metadefs/compute-libvirt-image.json loaded to database.^[[00m2015-12-30 22:24:55.624 | 2015-12-31 06:24:55.624 ^[[00;36mINFO glance.db.sqlalchemy.metadata [^[[00;36m-^[[00;36m] ^[[01;35m^[[00;36mFile /etc/glance/metadefs/compute-aggr-disk-filter.json loaded to database.^[[00m2015-12-30 22:24:55.681 | 2015-12-31 06:24:55.681 ^[[00;36mINFO glance.db.sqlalchemy.metadata [^[[00;36m-^[[00;36m] ^[[01;35m^[[00;36mFile /etc/glance/metadefs/software-runtimes.json loaded to database.^[[00m2015-12-30 22:24:55.722 | 2015-12-31 06:24:55.722 ^[[00;36mINFO glance.db.sqlalchemy.metadata [^[[00;36m-^[[00;36m] ^[[01;35m^[[00;36mFile /etc/glance/metadefs/compute-vmware.json loaded to database.^[[00m2015-12-30 22:24:55.775 | 2015-12-31 06:24:55.775 ^[[00;36mINFO glance.db.sqlalchemy.metadata [^[[00;36m-^[[00;36m] ^[[01;35m^[[00;36mFile /etc/glance/metadefs/software-webservers.json loaded to database.^[[00m2015-12-30 22:24:55.824 | 2015-12-31 06:24:55.824 ^[[00;36mINFO glance.db.sqlalchemy.metadata [^[[00;36m-^[[00;36m] ^[[01;35m^[[00;36mFile /etc/glance/metadefs/glance-common-image-props.json loaded to database.^[[00m2015-12-30 22:24:55.824 | 2015-12-31 06:24:55.824 ^[[00;36mINFO glance.db.sqlalchemy.metadata [^[[00;36m-^[[00;36m] ^[[01;35m^[[00;36mMetadata loading finished^[[00m2015-12-30 22:24:55.899 | /home/devstack/lib/neutron-legacy: line 884: /opt/stack/neutron/tools/generate_config_file_samples.sh: Permission denied2015-12-30 22:24:55.901 | Error on exit~
还是直接看官网文章吧
中间安装neutron的时候,有一个脚本/devstack/lib/neutron-legacy里面会运行/tools下面的generate_config_file_samples.sh,但是报错不存在,检查了,github上也的确不存在。
解决方法:
应该是devstack分支的问题 我对比了 devstack master和 stable/liberty 的/lib/neutron-legacy文件 发现master的neutron-legacy有执行generate_config_file_samples.sh,而stable/liberty的neutron-legacy是没有的,所以git clone devstack 的时候 -b 指定使用stable/liberty 分支应该就好了即更改git命令:
git clone -b stable/liberty
这样如果网络配好的话跑下来是没有问题的。
网络配置可以参考这篇参考文章
关于如何重启服务等相关问题